Secret Handshake Lead Generation System
License to install on any website owned by you, the registered student
Installation Instructions
NOTE 1: This is a technical process usually performed by the web manager.
NOTE 2: These procedures show how to integrate the Secret Handshake with ActiveCampaign. Some students have integrated the code with different CRM's, however; our instructors only have the ability to help with ActiveCampaign.
Overview
Step 1: Download the installation files
Step 2: Unzip the installation files on your local hard drive
Step 3: Create two forms in ActiveCampaign and modify the installation files
Step 4: Customize the text & image
Step 5: Install the files on your website
Detail
1. Download the installation files
Downloads
 Secret-Handshake-Installation-Code
This Secret Handshake Installation Code can be downloaded, then customized as per the instructions on this page.
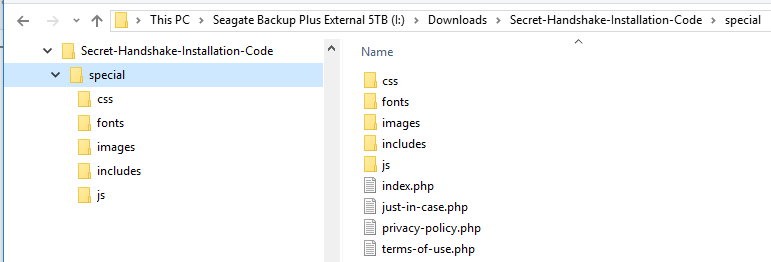
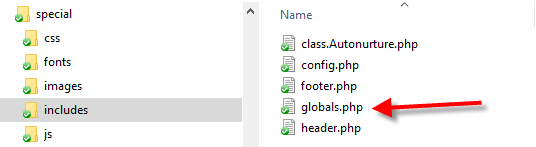
2. Unzip the file. You will then see a file structure that looks like this:
3. Create two forms in ActiveCampaign
The Secret Handshake collects data from prospects on two separate forms. The first form collects only email address. The second form collects name and phone number. Before you can use the code, it needs to be 'connected' to hidden forms which you must first create inside ActiveCampaign.
1. Login to ActiveCampaign
1a. If you have not yet created a List, do that before proceeding to next step:

Now create Form #1...
2. Click "Forms" option from the top menu
3. Click button "Create a New Form"
4. Enter a name for the form (i.e. secret handshake form 1).
5. Leave 'Inline' form selected
6. From the Action drop down menu, select Subscribe to List.
7. From the Options drop down menu, select the name of your list.
8. Click button "Create"
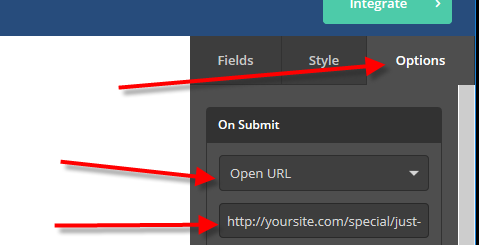
9. Click the 'Options' tab near top right.
10. Under 'On submit', change value from "show Thank You" to "Open URL" and enter the path of your just-in-case.php page: https://yoursite.com/special/just-in-case.php.
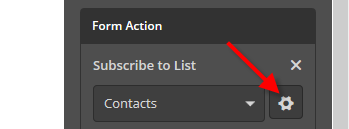
11. Click the gear button from the "Form Action" section
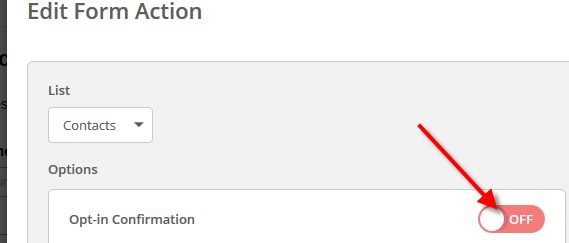
12. Turn off the Opt-in Confirmation option & Save.
13. Click "Integrate" button at the top right corner
14. In the ‘Full Embed’ section, search for <form which will take you to the opening form tag:

Copy the entire opening form tag. Note the opening and closing < >. You need to copy both of those and everything in between, like this:
<form method="POST" action="https://marketingeducationacademy.activehosted.com/proc.php" id="_form_3_" class="_form _form_3 _inline-form _dark" novalidate>
On some systems, you will be forced to copy all of the code. In that case, just paste it into any text editor first, and copy the above portion from that.
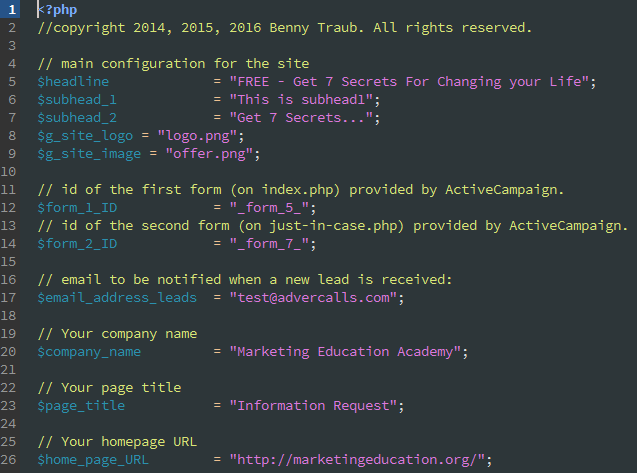
15. Open the file globals.php, located in the folder /special/includes
16. Near the top you'll see // Opening Tag of For #1. Replace the entire opening form tag with the code you copied from ActiveCampaign, including the opening and closing < > and everything in between.

17. Delete the text novalidate from inside the tag:

18. Copy the Form ID (including the underscores):

19. In the next section of Globals.php you'll see 'id of Form #1'. Paste the form id that you copied in the previous step:

20. Save your file
Now create Form #2...
1. Login to ActiveCampaign.com
2. Click "Forms" button from the top menu
3. Click "New Form"
4. Select "Inline Form" style
5. Setup a name and action
6. Click "Integrate" button at the top right corner
7. Enter a name for the form (i.e. secret handshake form 2).
8. Select an Action from the drop down menu (i.e. Subscribe to List)
9. Click "Option" button from the top right corner
10. Change "On submit" value to "Open URL" and type the path of your thank-you page. For example: https://examplesite.com/thanks
11. Click the gear button from the "Form Action" section
12. Turn off the Opt-in Confirmation option
13. Click "Integrate" button at the top right corner
14. In the ‘Full Embed’ section, search for <form which will take you to the opening form tag. Copy the entire opening form tag. It will look something like this:
<form class="form-horizontal" role="form" method="POST" action="https://yourdomain.activehosted.com/proc.php" id="_form_4_" novalidate>
Note the opening and closing < >. You need to copy both of those and everything in between.
19. Repeat the steps above for the second form.
The file you will be editing this time is: /special/just-in-case.php. Other than that, all of the above instructions are the same.
Step 4: Customize images & text
1. Replace the logo image and offer image located in /special/images/.

3. Customize globals.php as shown here:
Step 5. Install the files on your webserver
Using FTP or other file transfer system, copy the folder '/special' onto the root of your webserver. The system will now be available at https://yourdomain.com/special.
At your option, you may rename the folder 'special' to any name you desire.